
How to Trace a Roof Flashing Leak Safely
Learn how chimney, vent, wall, and skylight flashing leaks develop, how to document the moisture path safely, and when a Western North Carolina roof needs professional repair.
Key Takeaways
A ceiling stain below a chimney, vent pipe, wall intersection, or skylight often points toward a flashing problem, but the stain alone does not prove where water entered. Water can travel along decking, rafters, insulation, and fasteners before it becomes visible inside the room.
Start by protecting the interior, moving belongings out of the drip area, and photographing the stain. Do not enter an attic near wet wiring, sagging material, or visibly compromised framing. From there, a methodical inspection can distinguish a small isolated opening from a failed flashing assembly that needs to be rebuilt.
What Roof Flashing Does
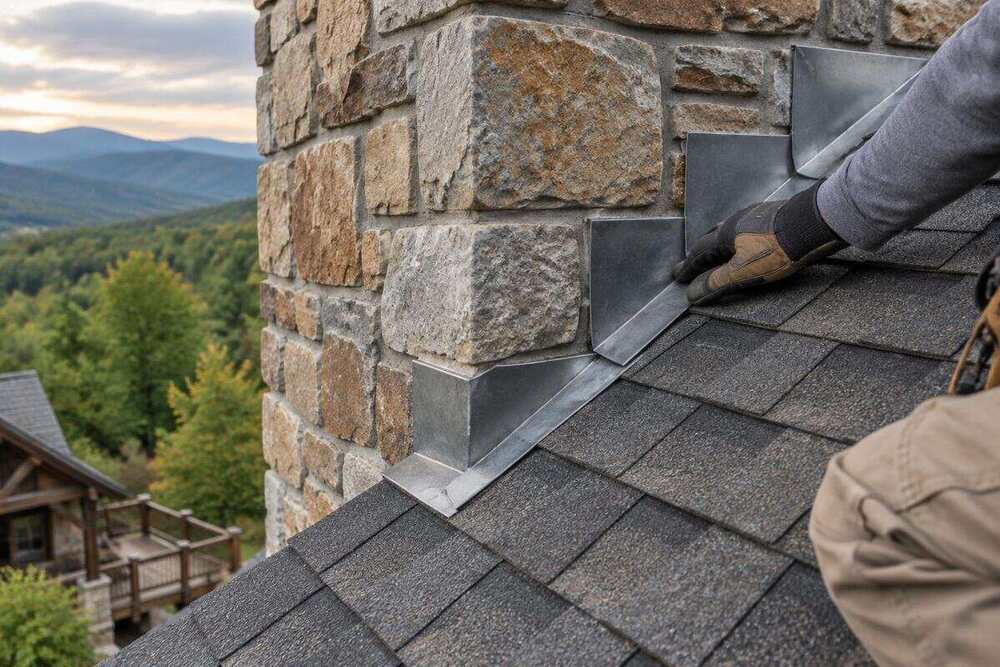
Flashing is the metal or membrane detail that moves water across places where the roof changes direction or meets another surface. Common locations include chimneys, sidewalls, dormers, plumbing vents, skylights, valleys, and roof edges.
Roofing material sheds water across the open roof plane. Flashing protects the interruptions:
- Step flashing interlocks with individual shingle courses where a roof meets a wall or chimney.
- Counterflashing covers the upper edge of step flashing and is commonly integrated with masonry.
- Vent flashing or boots seal around pipes that pass through the roof.
- Skylight flashing directs water around the curb or frame as a coordinated kit.
- Valley flashing and membrane carry concentrated runoff where two roof slopes meet.
These pieces must overlap in the direction of water flow. Sealant can support certain joints, but it should not replace correctly layered flashing.
Why Flashing Leaks Develop
Flashing usually fails through a combination of weather, movement, material compatibility, and installation details rather than one sudden event.
Age and Weather Exposure
Sunlight and temperature swings can dry and split rubber vent boots and exposed sealants. Western North Carolina's freeze-thaw cycles also move metal, fasteners, masonry, and roofing materials at different rates. A small opening can widen over repeated seasons.
Incorrect Overlaps or Missing Pieces
Water can move behind flashing when an upper piece sits beneath a lower piece, step flashing is omitted between shingle courses, or counterflashing is only surface-sealed to masonry. A thick bead of roofing cement may hide the detail without correcting it.
Corrosion and Incompatible Materials
Galvanized steel, aluminum, copper, fasteners, masonry, and repair products do not all react the same way. Mixing incompatible metals or trapping wet debris against flashing can accelerate corrosion. Broad rust, holes, or split seams usually require more than another surface coat.
Storm or Mechanical Damage
Hail, wind-driven debris, falling branches, and foot traffic can bend edges, puncture metal, loosen fasteners, or crack a vent boot. If the leak began after severe weather, note the storm date and photograph related damage from a safe location.
Warning Signs to Document
The most useful clues connect the interior moisture pattern with a nearby roof feature and the weather that causes the leak.
- Rust streaks or pitting on exposed metal
- Lifted, bent, or separated flashing edges
- Cracked or shrunken sealant around a boot or curb
- A split rubber collar around a plumbing vent
- Loose or exposed fasteners near a joint
- Repeated tar or roof-cement patches
- Dark attic staining that follows a rafter or roof deck seam
- A stain that appears only during wind-driven rain or snow melt
A chimney stain during hard rain may involve counterflashing, step flashing, the chimney cap, or porous masonry. A skylight stain may come from the flashing kit, condensation, surrounding roofing, or ice buildup. Diagnosis should rule out nearby sources rather than assuming the closest visible feature is responsible.
How to Trace the Water Path Safely
Work from the inside out and record evidence before anyone disturbs the roof surface.
- Map the interior stain. Note its position relative to exterior walls, the ridge, and the eave. Record whether it appears during light rain, wind-driven rain, snow melt, or every storm.
- Check the attic only when conditions are safe. Use a flashlight to follow staining upslope. Photograph damp insulation, dark decking, rusted fasteners, and the highest visible moisture point.
- Review the roof from the ground. Binoculars or a zoom lens can reveal displaced shingles, open flashing edges, damaged vent boots, debris, and previous patches.
- Compare nearby features. A stain near a chimney may originate at an uphill valley or wall intersection. Water often travels before it drops into the room.
- Request a physical inspection. A professional can inspect the exterior assembly, moisture path, surrounding roofing, and deck condition before writing the repair scope.
Do not climb onto a wet, steep, icy, mossy, elevated, or visibly damaged roof. A controlled hose test can help isolate a stubborn leak, but it should be performed by a roofing professional who can test small areas without forcing water beneath otherwise sound material.
What a Controlled Water Test Involves
When visual evidence is not enough, a roofing professional may use controlled water testing with one person outside and another monitoring the interior. The test starts below the suspected entry point and moves upward in small stages, allowing enough time at each stage for water to travel.
Testing too broad an area at once can create a false result. Spraying upward beneath shingles or flooding a chimney can also introduce water where ordinary rain would not. The goal is to reproduce the leak carefully, not soak the complete roof section.
The test should stop if water approaches wiring, framing appears compromised, or the exterior surface becomes unsafe.
Temporary Patch or Corrective Repair?
A temporary patch may be reasonable when a professional finds one isolated opening and confirms the surrounding flashing, roofing, underlayment, and decking remain sound. The repair material must be compatible with the existing assembly and applied according to its instructions.
A corrective repair is more appropriate when:
- The leak has returned after earlier patches.
- Step flashing is missing or incorrectly layered.
- Counterflashing has separated from masonry.
- A vent boot is split or brittle.
- Metal is broadly corroded, punctured, or poorly lapped.
- Decking is wet, soft, delaminated, or decayed.
- The leak involves a chimney, skylight, valley, or several intersecting roof planes.
Corrective work may require removing enough roofing to expose the complete detail, replacing damaged decking or underlayment, installing compatible flashing, and reinstalling the roof covering so every layer sheds water over the layer below it.
Why Surface Sealant Often Fails
Sealant performs best where the roof or flashing system calls for it. It performs poorly when it is expected to replace missing metal, bridge a moving joint indefinitely, cover rust, or bond to damp and dirty material.
Repeated roof-cement patches can also make later diagnosis harder by hiding fasteners, laps, and cracks. If a patched area leaks again, adding more material without exposing the original detail usually treats the symptom rather than the cause.
Mountain Conditions That Matter
Mountain roofs around Franklin, Highlands, Cashiers, Sylva, and neighboring communities face steep pitches, mature tree cover, rapid temperature changes, shaded roof sections, and wind-driven rain. Snow and freeze-thaw cycles can slow drainage and test joints that remain dry in milder conditions.
Roof geometry matters too. A chimney below a steep upper slope receives more runoff than one near a ridge. A skylight close to a valley can collect water from several directions. Pine needles and leaves can hold moisture against flashing and redirect water beneath shingle edges.
This is why a roof repair assessment should consider the complete drainage path, not just the spot above the ceiling stain.
Preventive Checks From the Ground
Homeowners can reduce risk without stepping onto the roof:
- Look for visible flashing changes after severe storms and major leaf drop.
- Keep gutters and downspouts clear so water does not back up at roof edges.
- Use dated photographs to track rust, gaps, or lifted edges over time.
- Check the attic after prolonged rain for new staining or damp insulation.
- Have overhanging branches managed by a qualified tree professional.
- Schedule an inspection when a vent boot cracks, a patch changes shape, or a stain returns.
If a skylight is near the moisture path, review the signs in our skylight leak guide. If the leak follows an inside roof angle, compare it with the roof valley leak guide.
What a Written Repair Scope Should Include
A useful proposal explains what the contractor believes is leaking and how the repair addresses that water path. It should identify:
- The suspected entry point and supporting evidence
- Roofing, flashing, underlayment, or decking to be removed
- Materials and compatible fasteners to be installed
- How the replacement will integrate with surrounding roofing or masonry
- Any conditions that could change the scope once concealed material is exposed
- The method for documenting and verifying completed work
Vague instructions to coat the area with roof cement are not the same as a flashing repair scope. Before-and-after photographs and a clear explanation of the completed assembly make future maintenance easier.
When to Call a Roofing Professional
Call a licensed roofing professional when a leak repeats, the roof is steep or difficult to access, metal is broadly corroded, decking may be damaged, water is near electrical service, or several roof features meet near the stain.
Highlander Building Services, Inc. evaluates flashing leaks across Western North Carolina and provides documented findings with a written repair scope. The inspection can determine whether the practical next step is a targeted roof repair, work around a skylight, or a broader roofing correction.
If water is actively entering the home, move belongings away from the area and contain the drip only where it is safe. Then request an inspection or call (828) 524-7773. Avoid wet wiring, sagging ceilings, and compromised attic framing while you wait for help.
Local to Franklin, NC
This article was written specifically for homeowners in Franklin and the surrounding area. Highlander Building Services serves Franklin and all of Western North Carolina with in-person consultations and local crews.
Talk With Our Local TeamFrequently Asked Questions
How can I tell whether roof flashing is leaking?
A stain below a chimney, vent, wall intersection, or skylight is a clue, but water can travel along decking and framing before it appears. Document the highest visible moisture point in the attic, note the weather conditions, and have the exterior detail inspected before choosing a repair.
Can roof cement permanently fix leaking flashing?
Roof cement may slow water at a small isolated opening, but it does not correct separated counterflashing, failed step flashing, damaged decking, or an incorrectly layered assembly. Repeated surface patches usually signal that the water path has not been fully diagnosed.
Why does a chimney leak only during heavy rain?
Wind-driven rain can enter a small gap where counterflashing meets masonry or where step flashing is poorly integrated with shingles. Heavy runoff can also expose a weak joint that does not leak during lighter rain.
Should a homeowner use a hose to find a roof leak?
A controlled water test can help isolate a difficult leak, but it should be performed by a roofing professional on steep, elevated, wet, mossy, or complex roofs. Homeowners can safely document interior evidence and exterior conditions from the ground.
When does flashing need replacement instead of sealant?
Replacement is usually appropriate when metal is broadly corroded, laps are incorrect, step flashing is missing, a vent boot is split, decking is damaged, or the leak has returned after earlier surface patches.
Related Services
Have your roof looked at in Franklin, NC
Most maintenance issues are cheap to fix and expensive to ignore. We'll tell you which one this is.
- 4.8★ Google · 158 reviews
- Licensed & insured · family-owned since 2017
- Franklin-based crews across 9 WNC counties
Calls are answered by the local team during working hours. Messages get a reply within one business day.
More for Franklin, NC
Real Work in Franklin
Market Context
Roofing & Construction in Franklin
Explore localized standards and proven projects in your area.
Written By
Highlander Editorial Team
Highlander Building Services
Expert roofing and construction guidance from the team that builds in Western North Carolina's mountains every day.
Why Highlander
Roofing help in Franklin, NC
Photos, findings, and a written scope — no pressure to buy anything.
(828) 524-7773Request an Inspection